Tassels are cheerful things, and easy to make. They've been popular decorations since the Middle Ages. But I'd always thought them too flimsy for practicality. They're usually attached to whatever they're meant to embellish by nothing more than a little scrap of thread, and come flying off at the slightest provocation.
![]() Then I came across a photo*
of a 13th-century reliquary bag on the site of the Royal Institute
for the Study and Conservation of Belgium's Artistic Heritage.
The more I looked at the tassels on the bottom of the bag, the
more convinced I became that they weren't tied on at all, but
built directly in to the edge of the piece. Once I grasped that
idea, it wasn't hard to see how one might re-create the effect.
Then I came across a photo*
of a 13th-century reliquary bag on the site of the Royal Institute
for the Study and Conservation of Belgium's Artistic Heritage.
The more I looked at the tassels on the bottom of the bag, the
more convinced I became that they weren't tied on at all, but
built directly in to the edge of the piece. Once I grasped that
idea, it wasn't hard to see how one might re-create the effect.
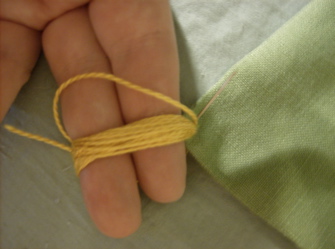
Thread a sharp embroidery needle with the thread you wish to use for the tassel. Stick the needle through the fabric where you want the tassel to hang, and pull the thread through until the tail is just a little longer than you want the finished tassel to be. Then loop the thread around something about as big around as you want the tassels to be long, and put the needle through again, in the same spot. Pull the thread just until the loop is snug (flush against whatever you're wrapping around, but not tight). Make another loop, and another, until you've got the bulk you want for your tassel.
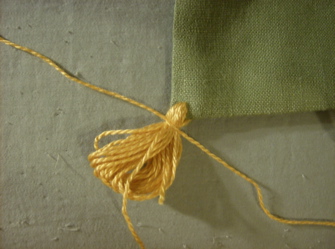
When you're happy with the size of your tassel, cut any excess thread off, leaving yourself a piece about the same length as the tail you started with. Slide out whatever you wrapped the thread around. You'll have a bunch of loops, plus the two loose ends. Tie a spare length of thread (of the same type or some other) around the bunch, as close as possible to the fabric and as tightly as possible around the thread. Knot it securely.
If you want to create a heavier "band" around the base of your tassel, wrap each end of the string around it, directly over the first loop you tied off, the tie it again. If you don't want to leave the ends of the string sticking out to the sides of the tassel, thread each of them in turn onto the needle and run it into the fabric and down, out the middle of the tassel.
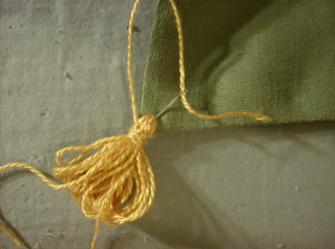
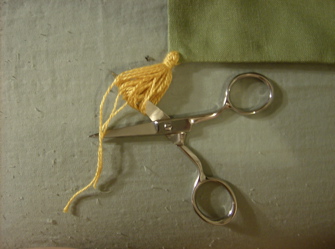
If the thread doesn't match and you want to hide the ends, clip them off short inside the bundle. If you've used the same thread to tie off that you used to make the tassel, just let the ends hang down with the rest of them. Insert one blade of a sharp pair of scissors into the loops, pull them gently taut, and cut them right at the bottom.
Hold the threads together, and trim off any extra-long ones so they're all roughly the same length. Smooth the tassel with your fingers to be sure none of them are curled up inside the bunch.

If you want to make more than one tassel, and want them all to be the same size when finished, before you begin making them simply wrap your thread around whatever you're going to wrap to make the tassels. Stop when you've got the size you want, and cut the thread off the skein (leaving a little extra just in case). Use the cut piece of thread to measure out another for each additional tassel you're going to make. Then proceed as described above, but be sure to count your loops as you go, giving each tassel the same number. They'll automatically come out the same length and thickness.
This website is maintained by Coblaith Muimnech, who holds the copyright on all content not attributed to others. Printed copies may be made and distributed for non-commercial purposes, provided the author is credited. Please do not reproduce this article, with or without its accompanying illustrations, elsewhere on the Internet without first obtaining specific permission.