Two Simple Tablet-Weaving Looms
 You don't actually need a loom
to do tablet weaving. (That's part of what makes it such an accessible
craft.) You can tie one end of your warp to anything stationary
and hold the other in your hand, or tie both ends to, say, the
legs of a table or the handles of two latched doors and weave
away. But as I prepared to teach my kids'
tablet weaving class, I realized the only feasible option,
given restrictions on time and space and the ages of my prospective
students, was to use sort of tensioning device that could easily
be transported from my home to the event site already warped.
You don't actually need a loom
to do tablet weaving. (That's part of what makes it such an accessible
craft.) You can tie one end of your warp to anything stationary
and hold the other in your hand, or tie both ends to, say, the
legs of a table or the handles of two latched doors and weave
away. But as I prepared to teach my kids'
tablet weaving class, I realized the only feasible option,
given restrictions on time and space and the ages of my prospective
students, was to use sort of tensioning device that could easily
be transported from my home to the event site already warped.
I considered just using some of the fruit crates I had around
the house, tying my warp to the ends (as shown at right). A trial
of this approach proved it to be workable but awkward. The available
warp space is limited, requiring the me to frequently untie the
ends, move the warp along, and re-tie. Passing the weft and packing
the warp was also somewhat inconvenient, as it required me to
get my hands down into the crate. It would do, in a pinch--at
least for an adult--but I decided it wasn't a viable choice for
the class.
I searched the web and asked the members of some of the mailing
lists to which I belong for suggestions, considered a number of
possible approaches, and, in the end, found two designs that I
viewed as serious contenders--Herveus'
Quick-and-Sleazy Student Loom and Toli's
Cardweaving Mini-Loom. Both could be executed relatively quickly
and inexpensively by someone (like myself) with limited woodworking
skills and basic tools. Several looms of either type would fit
in the trunk of my car and then on the top of a single six-by-four-foot
table. And the designers of both reported their past successful
use in tabletweaving classes. Neither design is historically-based,
so suiting the equipment to the period reflected in the event's
theme wasn't a consideration.
I chose Toli's Cardweaving Mini-Loom for three reasons:
- It has a shorter warp length and the warp is held semi-upright
in front of the weaver, so I thought it likely the kids would
find it easier to reach wherever they'd need to using it.
- It looked like it would be significantly lighter and, due
to its shape, easier to carry.
- I was concerned that Herveus' Quick-and-Sleazy Student Loom
might have a tendency to tip over on its side if bumped or carelessly
handled, possibly landing on little fingers or at least resulting
in dropped or tangled threads and frustrated weavers.
I made instructions for making both looms available as hand-outs
for the parents of my students on the day of the class, in case
one of the participants was inspired to do more weaving later.
They're repeated below.
Herveus' Quick-and-Sleazy
Student Loom
Master Herveus d'Ormonde (of White
Wolf and the Phoenix) responded to my question about simple
loom ideas with a description of a design he uses when he teaches
tablet weaving. It works much as medieval
weaving frames did, but on a reduced scale. I asked some questions,
made some illustrations, and generated the following instructions
for his loom.
Materials
- a 3- or 4-foot length of 2 X 4 lumber
- two 8-inch-long dowels
- one or two shorter dowels to serve as cleats, if you wan
them
Equipment
- a drill
- a drill bit a little larger in diameter than your dowels
- sand paper
About an inch and a half from each end of the two-by-four,
on the narrow edge, drill a two-inch-deep hole that slants slightly
outward. It should be just barely bigger in circumference than
your dowel.
Insert the dowels into the holes and test the fit. They should
be just loose enough to turn in the holes. Sand or shave them
a little if you need to.

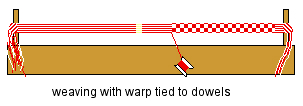
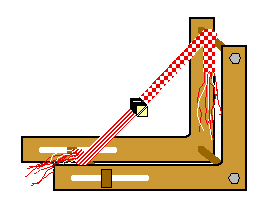
You can use a circular warp or tie the ends of your warp to
the dowels. To use the loom, either set it on a table with the
dowels upright, as shown below, or set one end on your lap and
one on a table or the ground.

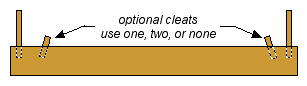
If you'd like to add a little more flexibility to the loom,
you can drill an additional hole between the first two, near and
slanted away from one of them, and insert a shorter length of
dowel to make a cleat. Or you can do that at both ends, and make
two cleats.
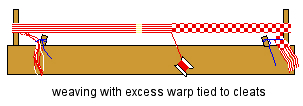
For tension adjustment or for warps longer or shorter than
the space between the dowels, you tie a cord to one end of the
warp and tie it off to the dowel, or lead it around the dowel
and use the cleat or the other dowel to secure it.
Toli's Cardweaving Mini-Loom
HL Toli the Curious has webbed plans
for a loom he designed which is similar to the 19th-century inkle
looms that many SCAdians use but less expensively constructed.
Hidden away at the bottom of the page I found a suggestion as
to what one might do with the trimmings from that project--make
a "mini-loom" that looked perfect for my purposes. No
step-by-step directions for doing this were given, as the procedure
was just a simplification of that used in the larger loom. I'm
far from an expert woodworker, however, and I wanted to be sure
I had every step of the process clearly laid out before I started.
I therefore took the instructions for the larger, more elaborate
loom and re-wrote them, incorporating the necessary adaptations
and some additional information that I collected from HL Toli.
(He was remarkably patient in answering my questions.) The instructions
that follow are the result. The words are mine, the ideas came
from him.
This loom is appropriate for tablet or rigid-heddle weaving.
It can be warped circularly, or the warp can be tied to two of
the dowels.
Materials
- an 18-inch length of 12-inch-wide particle board shelving
(You could substitute a hardwood, plywood, or MDF, but a soft
wood like pine would warp and crack under the tension.)
- an 18-inch-long dowel 1 inch in diameter
- two hanger bolts (Toli uses two-and-a-half-inch
long quarter-inch hanger bolts with 20 threads to the inch.)
- two 3-prong T-nuts sized and threaded
to fit the machine end of the hanger bolts (E.g., Toli uses quarter-inch
T-nuts with 20 threads to the inch.)
- four lag bolts with the same diameter as the hanger bolts
- two pieces of 1 X 2 lumber between one-and-three-quarters
and three inches long (For knobs--choose something you'll want
to handle.)
Equipment
- a coping, scroll, or jig saw
- a mitre box and saw
- locking pliers
- a hex driver that fits your lag bolts
- a mallet
- clamps appropriate for securing two layers of your board
together face-to-face
- a drill (You can use a hand-held drill, but a drill press
is better.)
- one drill bit slightly smaller than the outer diameter of
the lag threads on your hanger bolts (for pre-drilling the dowels
and the holes in the side pieces through which the non-tensioning
dowels will be attached)
- one drill bit the same size as the barrel insert of the t-nut
(for drilling the T-nut holes and the ends of the tensioning
slots)
- sand paper
Preparing the Parts
Cut the doweling into three equal lengths, using the mitre
box to ensure the cuts are perpindicular to the long axis of the
dowel. Use the smaller drill bit to pre-drill both ends of each
dowel, taking care to center the holes
and keep them perpindicular to the ends. Make sure the holes are
the right depth. The ones that will be fixed will have to admit
most of the lag bolts (minus only the thickness of the board).
The one that will be your tensioning dowel will have to admit
all of the hanger bolts except the portions that will pass through
the slots and the parts that will be accepted by the T-nuts.
Using the larger bit, drill into the center of each piece of
1 X 2 lumber. Do not go all the way through the wood; only penetrate
to the depth required to accommodate the shafts of your T-nuts.
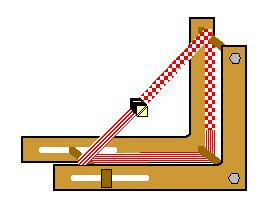
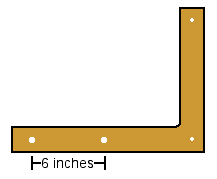
Cut from the board two L-shaped pieces, as shown in the diagram
below.

On one of the side pieces, carefully mark the positions of
four holes: 2 where the centers of your fixed dowels will be,
and two where the ends of the tensioning slot will. Make sure
the holes will be at least an inch from all edges of the board
and that the tensioning-slot holes are about six inches apart.
Firmly clamp the two L-shaped pieces together, one on top of
the other, with their edges aligned. Drill your holes as marked,
using the smaller drill bit for the dowel-fixing holes and the
larger for the ends of the tensioning slot, going through both
pieces of wood at the same time.
Unclamp the side pieces, then use your coping, scroll, or jig
saw to cut out the tensioning slot on each one. (Just connect
the tops and bottoms of the holes you drilled.)

Check to make sure everything is as smooth as it should be;
sand where necessary. If you'd like to decorate the side pieces
or the pieces of 1 X 2 that will serve as your knobs, do so now.
Don't paint or stain the dowels.
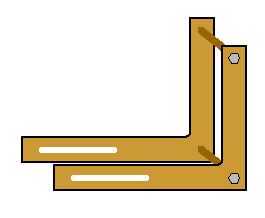
Assembly
Screw a lag bolt through one of the small holes in one side
piece and into the hole in the end of a dowel. Repeat with the
other hole and another dowel. Then do the same with the other
side piece.
Lock your pliers onto the machine end of a hanger bolt, and
use them as a handle as you screw the lag end into a hole in the
remaining dowel. Repeat with the other hanger bolt at the other
end. This is now your tensioning dowel.

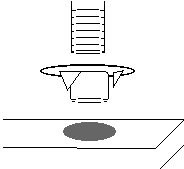
Insert a T-nut into the depression in each piece of 1 X 2.
Gently tap it in until the prongs are buried and the flange is
flat against the face of the wood. These are now knobs.
Slip the tensioning dowel between the ends of the side pieces
and rotate it into place so that the protruding hanger bolts stick
through the tensioning slots on either side. Screw a knob onto
each bolt.

When screwed down tight, the knobs should keep the tensioning
dowel from moving. If they won't come in far enough to do that,
you may need to screw the bolts further into the dowel. Unscrew
them and drill the holes deeper, if you have to, but be careful
not to widen them at the same time. You don't want the bolts to
be loose in the holes.
Ultimately I didn't make the looms we used in the class. Lord
Thomas of Conway made them for me. He modified the procedure,
thus:
- He used a chop saw with a stop to cut identical lengths of
doweling quickly.
- He made a router template and used that with a countertop
laminate bit to route the side pieces. The template had four
nails in it, at the sites of the holes that needed to be drilled.
Each time he placed it on the material to be cut the nails both
gripped the material so that the template wouldn't slip and marked
the precise locations for drilling.
- He made the side pieces out of three-quarter-inch plywood,
good on both sides, because he happened to have it around already.
- He couldn't find any T-nuts in the available time, so he
used wing-nuts instead of knobs.
- He put self-sealing washers under the lag bolts and flat
washers under the wing-nuts.
Clarifications for Novice Woodworkers
One end of a hanger bolt is pointed
and threaded like a lag bolt. The other is blunt and has machine
threads. If your local hardware store doesn't carry them, you
can find them through any number of vendors online, including
Lee
Valley Hardware.

T-nuts are designed to be fitted into holes
in wood, then to have bolts screwed into them. The prongs that
project from their flanges are tapped into the face of the wood
and hold them in. Again, if you can't get them in your neighborhood,
you can order them online from vendors like Lee
Valley Hardware.
There are a variety
of types of center finders on the market that make positioning
a centered hole in a dowel easier. It might be worth the investment,
especially if you're going to make multiple looms for a class
or guild.
This page was written and is maintained by Coblaith
Muimnech, who owns the copyright to all elements not attributed
to someone else, including all images less than 300 years old.
Please do not reproduce any portion of it without express permission.
Click to visit Coblaith's homepage
or the index to her articles on S.C.A.
kids' activities.