 |
 |
 |
|
|
|
|
Rectangular drawstring bags were an everyday sight in the Middle Ages. This is evidenced not only by the number of manuscripts in which they appear, but by the number of them, ranging from crude reliquary bags in cathedral collections to elaborately-embroidered sweet bags on display in museums, that survive to this day.
Because they are versatile and really, really easy to make, these bags are the perfect answer to the question, "How do I carry all the stuff I need at events without pockets?" These instructions will be for a straightforward, unlined, rectangular bag with finished seams. They assume you'll be using a non-stretchy, non-slippery, non-piled fabric, like plain-weave linen. If you have in fact chosen to use a fabric that requires special handling, be prepared to adapt them according to your own understanding of how to work with it. They also assume you'll be doing as much of the sewing as you can with a machine, but doing it by hand wouldn't require any major modifications.
The first step is to determine how big you need the bag to be. (These methods are adaptable to anything from a tiny pouch to a feed bag for your horse.)
Belt pouches should be balanced in size. You'll want to be able to get your hand in, so you can remove individual items without tipping the contents out. But you don't want too bulky a bag hanging off your belt, knocking into your knee. About two fists is a good size, in my experience.
If I'm making a bag from fabric I already have with a particular cargo in mind, I usually just fold the cargo into the fabric, gather the fabric above, and then mark the width and length it takes to completely enclose it with a little overhang. (It typically ends up being a bit more than I'd pictured using; this way, I don't have to worry about making the bag too small.) I clip the fabric at the right height and width, and tear it. If you've got the cargo but not the fabric, you can do the same thing with a sheet or a scrap of muslin, marking the height and width with a pin and then measuring to get the dimensions you'll need and buying accordingly. Of course, you can also measure your items, or just estimate how much room you'll need, if you're confident of your ability to do so effectively.
 In any event, take care to allow
for:
In any event, take care to allow
for:
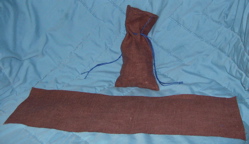
Also remember that, because there is no gusset or pleat at the bottom of the bag, its depth top-to-bottom will effectively decrease as the thickness front-to-back of whatever is put into it increases. The bag in the image to the left was made from a piece of linen the same size as the one laid out in front of it.
I'll describe three different ways to sew the bag together. Any of them will leave you with a bag with finished seams (no raw fabric edges), and no visible machine stitching. None of them are difficult to do, with or without a machine, or require any exotic stitches. Use whichever appeals most to you.
If you're a rank beginner, you may find some of the sewing
terms I use confusing. You may find a beginner's sewing
glossary useful, in that case.
This method requires the least amount of hand sewing. French seams were used in some period clothing, but I don't know whether any bags made with them have been found.
Fold your rectangle of fabric in half end-to-end, wrong sides together. Sew each side from the fold up, all the way to the ends.
Trim your seam allowance close to your stitches. Zig-zag between the stitches and the edge of the fabric or overcast the edges if your fabric ravels excessively. Turn your bag wrong-side-out, square up the corners and press it flat.
Sew each side from the fold up, all the way to the top of the bag, again.
Turn the top of the bag down about a quarter inch and press it. Turn it down another quarter inch and press again. Blind hem stitch all the way around the opening.
Turn your bag right-side-out. Square up the corners.
Proceed to Adding a Drawstring.
 This method requires
the most hand sewing, but does combine construction and embellishment
in one step. It produces a seam that looks, from the outside,
a great deal like those on a certain 13th-century
reliquary bag in the collection of the Royal Institute for
the Study and Conservation of Belgium's Artistic Heritage, and
the basic method was used in several surviving medieval garments
made of wool, but I don't know whether any extant medieval bags
were made this way. When you're finished, the inside of the bag
will look like the one shown in the image to the right (although,
of course, if you've not used a contrasting-color thread, as I
have here, the lines of stitching won't be so obvious).
This method requires
the most hand sewing, but does combine construction and embellishment
in one step. It produces a seam that looks, from the outside,
a great deal like those on a certain 13th-century
reliquary bag in the collection of the Royal Institute for
the Study and Conservation of Belgium's Artistic Heritage, and
the basic method was used in several surviving medieval garments
made of wool, but I don't know whether any extant medieval bags
were made this way. When you're finished, the inside of the bag
will look like the one shown in the image to the right (although,
of course, if you've not used a contrasting-color thread, as I
have here, the lines of stitching won't be so obvious).
Fold one long edge toward the wrong side by about a quarter inch and press it. Fold it down another quarter inch and press it again. Secure the fold using a blind hem stitch. Repeat with the other long side.
 Fold the rectangle in half end-to-end,
wrong sides together, and whip
stitch the sides closed as shown to the left. If you use embroidery
thread in a contrasting color, the seams will be decorative as
well as functional. Remember that the thread you use to whip stitch
will actually be holding the bag together, and choose something
with appropriate strength.
Fold the rectangle in half end-to-end,
wrong sides together, and whip
stitch the sides closed as shown to the left. If you use embroidery
thread in a contrasting color, the seams will be decorative as
well as functional. Remember that the thread you use to whip stitch
will actually be holding the bag together, and choose something
with appropriate strength.
Turn the bag inside out.
Turn the top of your bag down about a quarter inch and press it. Turn it down another quarter inch and press again. Blind hem stitch all the way around the opening.
Turn the bag right side out.
Proceed to Adding a Drawstring.
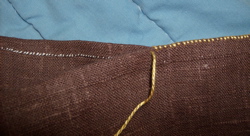
 This method will
produce a double seam with a decorative outer row of stitching.
It requires more hand sewing than a French seam, but less than
a whip-stitched seam. When you're finished, the inside of the
bag will look like the one in the image to the right (although,
of course, if you don't use a contrasting-color sewing thread
as I did here the stitches around the top won't show as much).
I don't know of any documented instances of this method of construction
in the Middle Ages or Renaissance, but since it is essentially
a marriage of the other two techniques I wouldn't be surprised
to discover one. The finished bag will look like one made with
whip stitching but will have stronger seams.
This method will
produce a double seam with a decorative outer row of stitching.
It requires more hand sewing than a French seam, but less than
a whip-stitched seam. When you're finished, the inside of the
bag will look like the one in the image to the right (although,
of course, if you don't use a contrasting-color sewing thread
as I did here the stitches around the top won't show as much).
I don't know of any documented instances of this method of construction
in the Middle Ages or Renaissance, but since it is essentially
a marriage of the other two techniques I wouldn't be surprised
to discover one. The finished bag will look like one made with
whip stitching but will have stronger seams.
Fold your rectangle of fabric in half end-to-end, wrong sides together. Sew each side from the fold up, all the way to the ends, using the smallest seam allowance possible. (If you have trouble sewing close to the edges of your fabric, you can take a bigger allowance and then carefully trim some of it off.) Zig-zag between your stitches and the edge of the fabric or overcast the edge if you're concerned about excessive raveling.
Turn the bag inside out and press it, taking care to get it as flat as possible and make firm creases along the sides. Then turn it right-side-out again.
 Poke
the very corner of the bag down inside so that a fold of fabric
forms on either side of the raw edge, just deep enough to cover
it. Pinch the fabric so that the folds close over the edge.
Poke
the very corner of the bag down inside so that a fold of fabric
forms on either side of the raw edge, just deep enough to cover
it. Pinch the fabric so that the folds close over the edge.
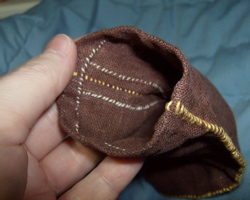
Whip stitch the folds together all the way up the side of the bag, using your embroidery thread, as shown in the image to the left. Make your stitches small and as even as possible. Be sure to keep the folds consistent in depth and the raw edges contained between them. (The fabric will naturally fold along the crease you pressed earlier, so although you want them to be consistent, too, you shouldn't have to worry about the folds inside the bag.) Repeat on the other seam.
Turn the bag inside out.
Turn down the top of the bag about a quarter inch and press it. Turn it down another quarter inch and press again. Blind hem stitch all the way around the opening.
Turn the bag right side out.
Proceed to Adding a Drawstring.
You'll want two lengths of cord, each long enough to go once around the mouth of your bag and knot. Braid, narrow strips of tablet-weaving, and twisted cordage are all reasonable choices. You can make the cords extra-long, to double as decorations, if you want, but remember that they will hang longer when the bag is closed than they will be when it's laid flat. If you're afraid your cord will come un-worked as you go, tie one end of it in a knot and leave enough extra on the other end to allow you to trim it later.
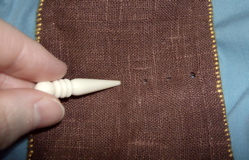 Lay your bag flat and make an even
number of regularly-spaced marks across it where you want the
drawstring to run. It's a good idea to leave at least a little
room for gathers at the top; it looks nice, and helps ensure the
bag closes completely. When you're happy with the positions, use
a fid, an eyelet
awl, or something similar to poke holes through both layers
of fabric as shown at left. (In a pinch, a chopstick that's been
sharpened and sanded smooth will do.) You won't be cutting the
fabric, just pushing the threads apart, so you don't have to worry
about it unravelling.
Lay your bag flat and make an even
number of regularly-spaced marks across it where you want the
drawstring to run. It's a good idea to leave at least a little
room for gathers at the top; it looks nice, and helps ensure the
bag closes completely. When you're happy with the positions, use
a fid, an eyelet
awl, or something similar to poke holes through both layers
of fabric as shown at left. (In a pinch, a chopstick that's been
sharpened and sanded smooth will do.) You won't be cutting the
fabric, just pushing the threads apart, so you don't have to worry
about it unravelling.
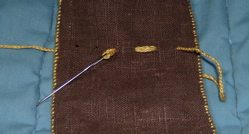 Thread the first length of cord
through a blunt tapestry needle. Run the needle in through a hole
next to a seam, out through the hole next to that, and so forth,
all the way around the bag, as shown in the image to the right.
Be sure your needle is going through only one layer of fabric
at a time. Use your awl to re-open and/or widen holes as you go
if need be.
Thread the first length of cord
through a blunt tapestry needle. Run the needle in through a hole
next to a seam, out through the hole next to that, and so forth,
all the way around the bag, as shown in the image to the right.
Be sure your needle is going through only one layer of fabric
at a time. Use your awl to re-open and/or widen holes as you go
if need be.
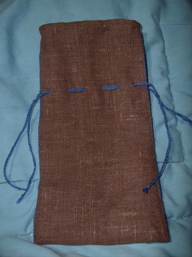
When you come out the last hole, tie the ends of your cord together close to the bag. (If you've got one end knotted to prevent the cord coming un-worked, knot and trim the other end first.) Work the top of the bag with your fingers to evenly distribute the cord.
Repeat the procedure with the other length of cord, starting next to the seam opposite the one where the first cord is knotted.
Draw the bag closed by pulling on both knotted ends at the same time. Each cord will provide resistance to the other, making it easy to close the bag tightly. Unless your cord and/or fabric is slippery, the bag should stay closed until you re-open it.
If you want to use this bag as a belt pouch, you'll want to add a hanging-strap to it. Such can also be convenient if you want to be able to hang the bag up anywhere else (on a hook in your closet, for instance). You'll need one sturdy cord, long enough for the bag to pass through easily, plus a few inches. Sew it to the outside of the bag, attaching either end of it near one seam.
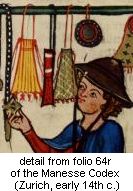
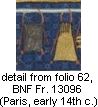
You could run your belt through the loop thus formed before buckling it. You would then, however, be unable to take off the pouch without taking off the belt. The more convenient option is to put your belt on first, thread the top of the hanging-strap between your belt and your clothing, and slip your pouch through the loop. If your belt comes equipped with a purse hanger, you'll do the same, but running the strap through the hanger rather than behind your belt. You can see this method of attachment at work in the illustrations from Alfonso's book of games, above.
This same general method can be used to make a leather pouch, although you naturally don't need to finish the seams or sew down the top edge. Punch the lacing holes before you sew the pouch together.
You don't have to make these bags out of boring materials, or leave them plain after they're made. Not every bag from the Middle Ages and Renaissance was decorative, but many were made of georgeous fabric, had fringe or tassels built in, were beautifully embroidered or strung with beads, or were otherwise lavished with attention until they became works of art.
If you want to use a directional fabric or use some small leftover pieces of fabric you have at home to make your bag, you can start with two matching rectangles--one for the front and one for the back of your bag--instead of one long one. Start by putting the rectangles wrong-sides-together, with the bottoms lined up, and stitching them together along the bottom. Turn the pieces right-sides-together and stitch along the bottom again. Now follow the bag-making directions above, but read "bottom seam" everywhere they refer to the bottom fold.
You can poke a double row of holes, if you prefer, and run one cord through each. There are surviving medieval bags done this way. The cords still knot on opposite sides. To ensure they will still pull against each other when you close the bag the rows need to be very close together.
If you wish to do so, you can make an extra-long hanging strap, perhaps ending in a tassel or bead, and sew it down the length of the pouch on either side. It will double as both decoration and re-enforcement for your seams.
Some medieval drawstring bags had a ring of wood, ivory, or metal sewn to the top edge. When the bag was closed, the ring hung down, making part of the bag above the hanging strap function as a sort of flap closing the top. Rings sold in craft and sewing stores as purse handles might be useful for this purpose.
Karen Larsdatter's included several links to images, among them photos, of drawstring pouches in her listing of medieval and Renaissance pouches and purses.
A burse for the great seal of England used by one of Elizabeth I's chancellors is pictured on the site of the Victoria and Albert museum. It features beading and embroidery and is an elaborate work of art in its own right.
Machteld makes beautiful drawstring pouches modeled on 14th-century examples like that in the collection of the Victoria and Albert museum pictured on drakt.org.
The A Stitch Out of Time gallery includes a number of pouches embroidered by various individuals using 14th- and 15th-century German techniques.
Martelle von Charlottenburg has webbed information on a pouch she embroidered with a polychrome blackwork pattern inspired by knot gardens.
Joyce Miller's French Almoner's Purse is based on examples from the middle of the 14th century. The article includes photos not only of her work but of her inspiration, as well.
Catherine de Arc's simply-embroidered 14th-century-style pouch uses tabletwoven straps to striking effect.
Charles Oakley's simple leather belt pouch is lovely. It has a built-in strap by which it hangs, but is otherwise essentially made as I describe.
This page was written and is maintained by Coblaith Muimnech. Please do not reproduce any portion of it anywhere without express permission.